
Why Wall-to-Wall
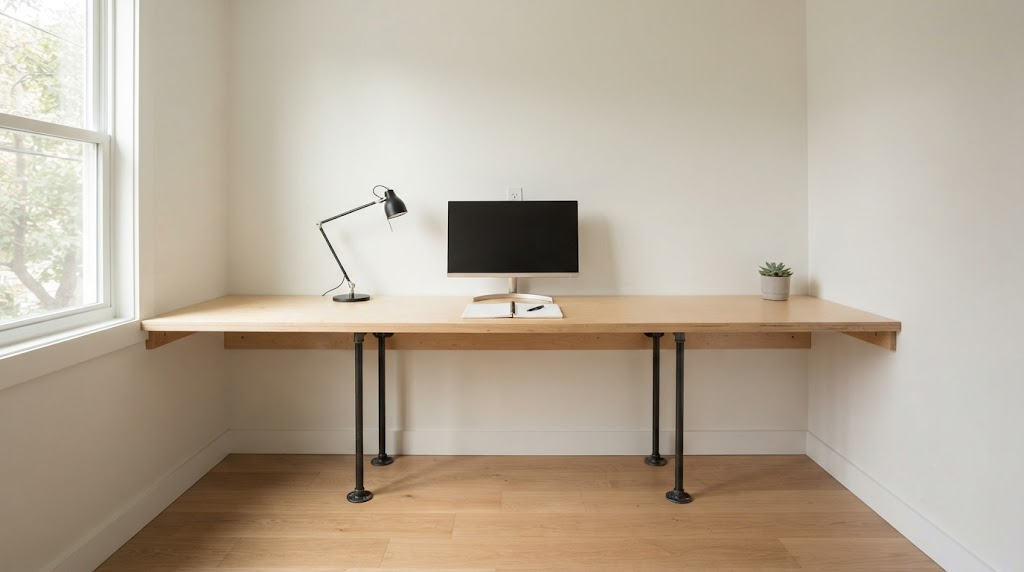
The longest desk that fits in most small home offices is 48 or 60 inches — whatever the freestanding furniture market sells. But a room that's 8 feet wide can hold a 96-inch desk if you're willing to mount it to the walls instead of putting it on legs. That's nearly double the surface area for the same footprint.
A wall-to-wall desk does three things that a freestanding desk can't. One, it eliminates the wasted inches on either side where dust collects and nothing useful happens. Two, it removes the front legs entirely, which means no knee interference and a cleaner visual line. Three, it anchors the room — the desk becomes part of the architecture, not a piece of furniture you can rearrange.
I've built this desk twice: once in my own garage-turned-office, and once for a friend with an 8×9-foot attic workspace. Both are still in daily use. This is the version I'd recommend for a first-time builder: simple joinery, forgiving materials, and no single step that requires a second pair of hands.
The Design
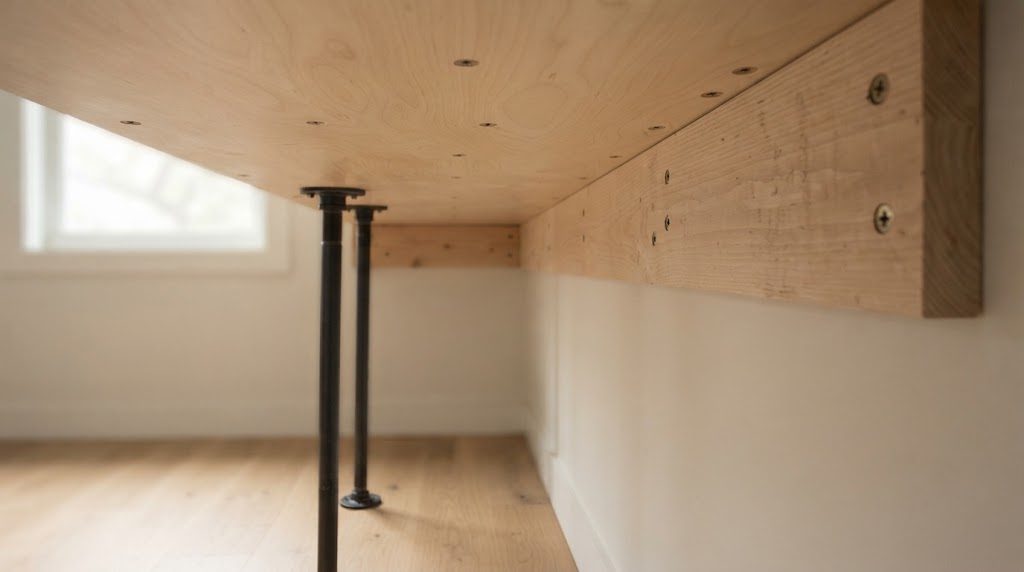
The desk is a single sheet of 3/4-inch birch plywood, cut to the exact width of the room and supported on three sides. The back edge rests on a 2×4 cleat screwed into the wall studs. The two short ends rest on additional cleats on the side walls. The front edge is supported by two steel pipe legs positioned roughly one-quarter of the way in from each end — far enough from the walls to leave legroom but close enough to prevent sagging across the span.
This design leaves the entire underside open except for the two pipe legs. No drawers to bump your knees on. No center legs to wrestle with. The cleats do most of the structural work, and the pipe legs handle the front-edge load.
Full Materials List
For a room 96 inches wide by 24 inches deep:
Lumber
1 sheet 3/4-inch birch plywood, 4×8 feet, cut to 96 inches × 24 inches (most home centers will make this cut for you if you don't have a truck; ask them to cut the 8-foot length from the 4×8 sheet, then rip to 24 inches width)
3 pieces 2×4 lumber, 8 feet each, for cleats (cut to length on site)
Steel Pipe and Fittings (for two legs)
2 pieces 1/2-inch black steel pipe, 28 inches long (adjust based on your finished desk height minus 1.5 inches for the flange and cap)
4 pieces 1/2-inch black steel floor flanges
2 pieces 1/2-inch black steel caps (optional, for floor contact)
16 wood screws, #10 × 3/4-inch, for attaching flanges to plywood
Mounting Hardware
24 construction screws, #10 × 3-inch, for attaching cleats to studs
12 wood screws, #8 × 1-1/4-inch, for attaching plywood to cleats from underneath
8 wood screws, #8 × 1-1/4-inch, for attaching side cleats if used
Finishing
120-grit and 220-grit sandpaper
1 quart satin water-based polyurethane
2 foam brushes or a small roller
Wood glue (for edge banding, if desired)
Iron-on birch edge banding, 25 feet (optional but recommended for a finished front edge)
Tools Required
Circular saw or track saw (or have the plywood cut at the lumber yard)
Drill/driver with Phillips and drill bits
Stud finder
4-foot level
Tape measure
Pencil
Clamps (two 12-inch bar clamps minimum, for holding cleats during installation)
Socket wrench or adjustable wrench (for tightening pipe fittings)
Sanding block or orbital sander
Countersink bit (optional, for flush screw heads)
The Cut Sheet
From one 4×8 sheet of 3/4-inch birch plywood:
Piece | Dimensions | Quantity |
|---|---|---|
Desk top | 96 inches × 24 inches | 1 |
That's the entire cut list. The cleats come from the 2×4 lumber, cut to:
Piece | Dimensions | Quantity |
|---|---|---|
Rear cleat | 96 inches | 1 |
Side cleats | 23-1/4 inches (desk depth minus 3/4 inch for rear cleat thickness) | 2 |
The pipe legs require no cutting if you buy pre-threaded nipples in 28-inch lengths, which is a standard size at most hardware stores. If your desired height is different, most stores will cut and thread pipe for you at no additional charge.
The Build: Step by Step
Step 1: Locate and Mark the Studs
The rear cleat must be screwed into studs — not drywall anchors. Use a stud finder to locate every stud along the back wall. Mark the center of each stud with a vertical pencil line extending from the floor to above your planned desk height. Standard stud spacing is 16 inches on center, which gives you roughly 7 studs across an 8-foot wall. You'll hit as many as you can with 3-inch construction screws — aim for at least every other stud, minimum.
For the side cleats, locate and mark studs on both side walls. In a standard-framed room, you'll find at least one stud in the 24-inch depth you're spanning. If you only hit one stud per side wall, supplement with toggle bolts rated for 100+ pounds each.
Step 2: Determine Desk Height and Mount the Rear Cleat
Standard desk height is 29 to 30 inches from the floor to the top of the finished surface. Since your plywood is 3/4-inch thick, the top of the cleat should sit at 28-1/4 inches for a 29-inch finished height, or 29-1/4 inches for a 30-inch finished height.
Measure up from the floor at each end of the back wall. Snap a chalk line or draw a level line connecting the two marks. Hold the rear cleat against the wall, top edge aligned with the line. Pre-drill through the cleat into the studs — two screws per stud, one near the top of the cleat and one near the bottom. Fasten with 3-inch construction screws.
Check for level after every two screws. A cleat that's even 1/8-inch out of level across 8 feet will telegraph through to the desk surface.
Step 3: Mount the Side Cleats
The side cleats sit at the same height as the rear cleat. They're shorter — 23-1/4 inches each, to accommodate the rear cleat's thickness. Hold each side cleat in position, top edge aligned with your height line, and fasten into the studs with 3-inch construction screws. The front end of the side cleat should sit flush with where the front edge of the desk will be.
If the side walls are not perfectly square to the back wall — and in most homes, they're not — you'll notice a small gap at one end of the cleat. Accept it. The plywood will bridge it. Do not shim the cleat to close the gap; the plywood needs full contact along the top edge, not the face.
Step 4: Assemble the Pipe Legs
Screw one floor flange onto each end of each 28-inch pipe — hand-tight, then a quarter-turn with the wrench. Attach a cap to the bottom flange if using. The legs will stand roughly 29-1/2 inches tall from floor to the top of the upper flange.
Set the legs aside. You'll attach them to the desk top after the plywood is in place. This is the one part of the build where working on the floor is easier than working at height.
Step 5: Place and Secure the Plywood Top
Lift the plywood onto the cleats. If you've measured correctly, the back edge rests on the rear cleat and the two side edges rest on the side cleats. The front edge overhangs the side cleats by roughly 1 inch — this is intentional and looks clean.
With the plywood in position, crawl underneath and fasten the plywood to the cleats from below using #8 × 1-1/4-inch screws. Drive screws every 12 to 16 inches along the rear cleat and every 8 inches along the side cleats. Pre-drill the holes to avoid splitting the plywood. The screws should pull the plywood tight against the cleats without breaking through the top surface — 1-1/4-inch screws in 3/4-inch plywood plus a 1-1/2-inch cleat leave you with just enough depth.
Step 6: Attach the Pipe Legs
With the desk surface secured to the walls, position each pipe leg under the front edge. The legs should sit approximately 20 to 24 inches in from each end — far enough to leave knee room when seated at the center, but close enough to the ends to support the span.
Mark the flange screw holes on the underside of the plywood. Pre-drill with a bit slightly smaller than the #10 screws. Attach the flanges with #10 × 3/4-inch screws — these are short enough that they won't break through the top surface of the 3/4-inch plywood.
Once both legs are attached, check that they're plumb and that the desk doesn't rock. If the floor is uneven, screw the bottom cap in or out slightly to adjust — steel pipe threads give you about a quarter-inch of height adjustment.
Step 7: Finish the Exposed Edges
The front edge of the plywood will show the raw ply layers. This is fine for a workshop but unfinished for a home office. You have two options.
Option A — Edge banding: Iron-on birch edge banding costs about $8 for a 25-foot roll. Cut a strip slightly longer than your desk width, iron it on with a household iron set to medium-high, press firmly with a scrap wood block while it cools, and trim the excess with a utility knife. Light sanding with 220-grit blends the seam. Apply polyurethane over the edge banding to match the top.
Option B — Face frame: Rip a 1×2 strip of solid birch or poplar to 1-1/2 inches wide, glue and clamp it to the front edge, then sand flush. This is the more durable option and costs only slightly more in materials, but it adds clamping time.
Step 8: Apply the Finish
Sand the entire desk top with 120-grit, then 220-grit. Wipe clean with a tack cloth. Apply satin water-based polyurethane in thin coats with a foam brush or small roller, working in the direction of the grain. Three coats minimum, with a light 220-grit sanding between coats. Water-based poly dries in 1–2 hours, so you can get all three coats done in a single day if you start in the morning.
Wait 24 hours after the final coat before placing equipment on the desk. The finish will continue to cure for several days, but light use is fine after 24 hours.
The Total Cost
At early-2026 prices at a typical home center:
Item | Cost |
|---|---|
3/4-inch birch plywood, 4×8 sheet | $65 |
2×4 lumber (3 pieces) | $12 |
Steel pipe and fittings | $45 |
Screws and hardware | $15 |
Edge banding (optional) | $8 |
Polyurethane (1 quart) | $18 |
Total | $163 |
That's for an 8-foot desk with a real wood surface. The closest freestanding equivalent in solid birch would run $800–$1,200. The labor is a Saturday, a drill, and the willingness to crawl under a desk with a screwdriver.